Showing posts with label process and production. Show all posts

Thursday, 21 April 2016

Analogue Communique 3D


金


金 from LEI TANG on Vimeo.
       “Gold” font in my class, I spent a long time to do, at last made a recommendation nick of animation, the animation is very simple pattern, mainly by the advent of a part, form the final picture this animation is very simple, in fact, I want to do a better work, but it is limited, so the effect is not satisfactory to finalize, I think I need more time to learn how to make the concept of animation and effects.

Wednesday, 20 April 2016

Analogue Communique 3D Lesson 3


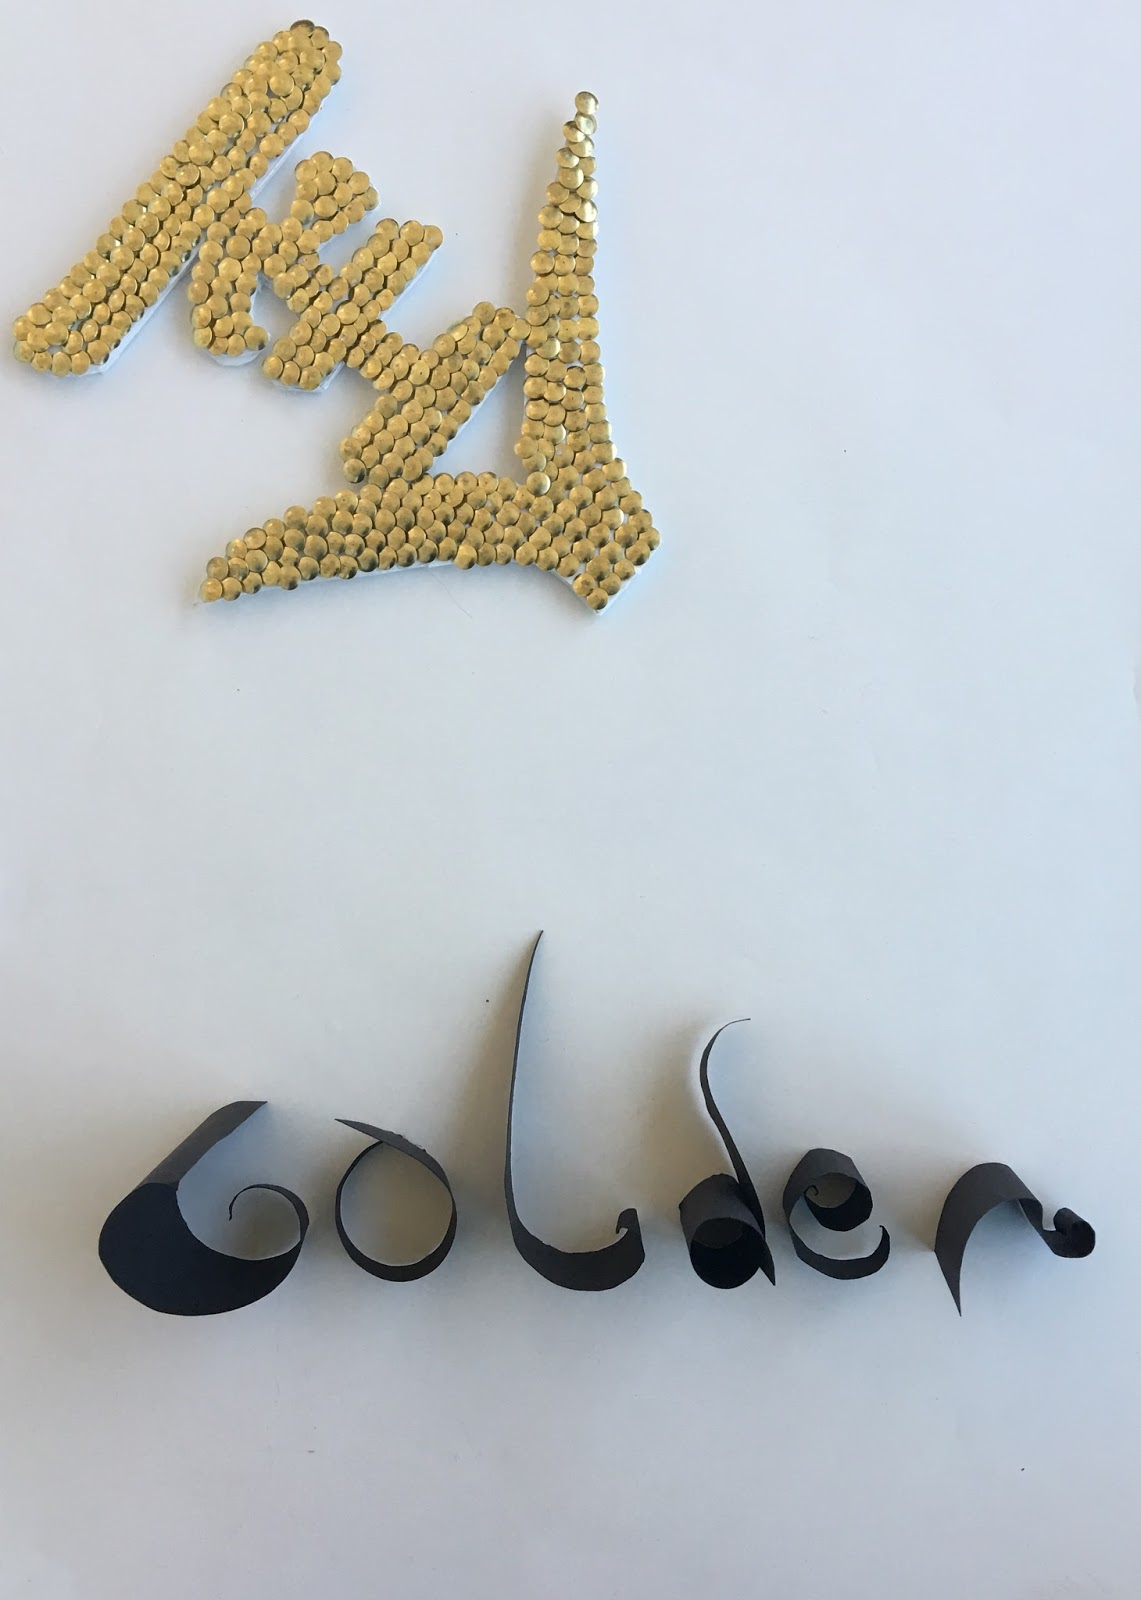
 金gloden

      According to the content of a lesson, I probably finished my work, but a light font is very simple, which makes me have a new idea, add some new elements, such as paper, or the background or the like. I found some black cardboard, hair cut these papers so that they bend to form a golden style, so that we can better to let people know the meaning of the word. nick gave me a lot of advice, such as new materials, to replace the white background wooden background. Also, I deliberately cut a label stuck on the font, the font so that the above additional fused to the following explanation, nick for my following fonts do some evaluation, he thought I should re-do those newly added section he felt that these fonts, you should let others misunderstood the meaning, should be changed to allow others to see clear fonts section, I also found the process of doing a tag is too large, not very consistent with the expression of the font, so I change the outside of the font, but also produced a new label, there is a white pen to write on a word. The work I was very satisfied, nick gave me a lot of help, give me find a lot of material, and ultimately let me finish this satisfying work.

Thursday, 14 April 2016

CINEMA 4D Lesson 3 Prototyping


1. Create a project folder
Project Name C4d
2. Set up Illustrator Open illustrator / open 'Canshape.ai'
Open rulers / Move centre to bottom of shape
Reduce art board size to fit
Save file as-Illustrator 8
3. Cinema4d Merge 'Canshape.ai' / rename paths / Create 2 Lathe
Nurbs / add each shape / rename accordingly / tick flip normals
4. Create an environment
Create a Floor / Create a Background
Add a Compositing tag to floor
tick 'composite background'
Create a new material / change colour
to white
Add material to floor & background
5. Create Materials
Create a new material
Add Reflectance to material
Add ... / Reflection (Legacy)
Layer Colour / Texture / Fresnel / dielectric / PET
Turn down Globals
Colour channel / add 'canable.jpg'
Add this to can lathe
6. Adjust Mapping
Material tag / projection / cylindrical
Side = front / Rt click / fit to object
test render / map should fit can
7. Create a Material
Add Reflect
ance to material
Colour / grey 36%
Reflect / Layer / GGX / Rough 20%
Layer Colour / Texture / Fresnel / dielectric / PET
Turn down Globals / 50% & 60%
Add this to top lathe
8. Add Lights
Omni Light / Coords XYZ /
-500, 1000, -500
Copy light / Coords XYZ / 500, 1000, -500
second light / intensity = 50%
Add an Area light / place on right of can
Coords XYZ / 500, 400, -400 / Rot H = 45deg
9. Render Settings
Anti-Aliasing / from Geometry to Best
Add Ambient Occlusion
Output / size = A4 portrait / dpi = 300
Current frame / save / jpg / 95%
Test Render
10. Add Clones
Cloner object / Random effector / Grid array
Count = 3,1,1 / Size = 400,200,200
Random effector / Parameter / rotation only
Rotation H = 180 (ish)
11. Render Out
Change background colour & lable artwork as necessary
Save file


 1. Set up Illustrator
Open illustrator / open 'bottle.ai'
Or create a bottle shape / and a liquid shape
Open rulers / Move centre point to bottom of shape
Reduce art board size to fit
Save file as
-Illustrator 8
2. Cinema4d
Merge 'bottle.ai' / rename paths
Create 2 Lathe Nurbs / a
dd each shape
rename accordingly / tick flip normals
3. Create an environment
Create a Floor / Create a Background
Add a Compositing tag to floor
tick 'composite background'
Create a new material / change colour to white
(?)
Add material to floor & background
4. Create Materials
Browser / Presets / broadcast / Materials
Glass / Glass Stained (green)
Transparency / Refraction = 1,2
Turn absorption to white
Turn off bump channel
Copy Material / change colour to yellow
Add yellow to liquid lathe
Add green mat to bottle lathe
5. Create a Lable
Add a cylinder object / caps / untick caps
Adjust size to fit snugly around bottle
new material / Alp
ha channel / add beer mask.jpg
Invert mask / add to cylinder
material tag / turn off tile / projection / cylindrical
Right click on tag / Fit to object
Colour channel / add 'bearlable.jpg'
Reflectance Channel
Add ... / Reflecti
on (Legacy)
Layer Colour / Texture / Fresnel / dielectric / jadeTurn down Globals / add to cylinder
6. Bottle Top
Spline tool / Add a Star shape / 20 points
XZ axis / inner rad = 33 / outer rad = 37
Add a Circle shape / Rad = 33
Add a Circle shape / Rad = 29
Add a Circle shape / Rad = 17
Add a Circle shape / Rad = 0
Create a Loft Nurbs / add all above shapes
Move to top of bottle / move shapes to create a cap
Select the loft object / U subdiv = 41 / V subdiv = 2
Iso subdiv = 3 / Tick Organic form / Caps / turn off
Simulate / Cloth? Cloth Surface / Add loft to this
Cloth surface / subdues = 2 / Thickness = 1
7. Cap Material
New Material /
Reflectance Channel
Add ... / Reflection (Legacy)
Layer Colour / Texture / Fresnel / dielectric / PET
Colour / add 'cap.jpg' / Add material to cap
Material tag / projection = flat
Rt click / fit to object / say yes to sub-object
Left of viewport toolbar / select Texture Mode
Use rotate tool to rotate texture 90deg
Rt click on texture tag / fit to object / say yes
Left of viewport toolbar / select Model Mode
8. Add Lights
Omni Light / Coords XYZ /
-500, 1000, -500
Copy light / Coords XYZ / 500, 1000, -500
second light / intensity = 50%
Add an Area light / place on right of bottle
Coords XYZ / 500, 400, -400 / Rot H = 45deg
9. Render Out
Save file / Render out


Thursday, 10 March 2016

After Effect: Final


I basically completed all my ae animation, in fact, the whole process I learned a lot of things, such as a variety of text effects there are some basic tips on how to connect to one screen, add background music, and I All ae's job is also customary to operate, in fact, when I use the camera, found some fundamental problem is that I do not use it, it is more difficult to control, as well as to control the bad effect on poor, so I think this is one of the most serious problems.

Thursday, 18 February 2016

Cinema 4D Lesson 1


Cinema 4D gives you excess of quick reality foundation, it allows you to be creative and it does not get in the way of creativity. 


1. Create a project folder Project Name C4d (C4d, texture images) Artwork (illustrator, photoshop,) Output (Images, Movies) 2. Set up Illustrator Open illustrator / open rulers Move centre point to centre of artboard create logo artwork Reduce art board size to fit Save file as (Logo.ai) - Illustrator 8 3. C4d - Project template Set format and Render Settings Change dimensions to Millimetres - 297x420 Set rendering to Current Frame 4. C4d - Display settings Mode / View Settings / View - tick Action Safe & Tinted Border (95%) 5. C4d - Import Logo File / Merge / Logo.ai file Create an Extrude Nurbs object Drag logo onto extrude nurbs Adjust settings in extrude nurbs 6. C4d - Environ setup Create a Background object Create a Floor object Create a Material and give it a name Add this material to floor and background Add a Compositing tag to floor Tick comp background in this tag
The lessons is very interesting, I really find a difficult job .


Wednesday, 17 February 2016

Analogue Communique 3D Lesson 2


金

According to the content of the lesson, the lesson I probably had a stroke, in order to make more three-dimensional nail, I chose to put the nail upside down, but the process is more difficult, because it is easy to tie hand, very dangerous, after done and out of the effect is not very good. So I immediately changed my mind, nick gave me some advice, I still feel better idea before, so I decided to change the original idea, nick a lot of material to find me, find me a white board, the board is too thin, the thickness of a piece I pay more, just the length of the nail is also just right, because before doing it, one by one, the nail is not strong enough, it is easy to fall, I intend stacked one by one, the last time nearly finished find the nail is not enough, so I bought a new nail, finally finished my work.

Thursday, 4 February 2016

Analogue Communique 3D Lesson1


金

In the following lesson we experimented with materials to create type using 3D Forms. The objective of this lesson is to communicate our message using our choice of material as a 3D type installation, i decided to use chinese words to make it. It means golden, so i want to make everything  is golden.

Tuesday, 26 January 2016

After Effect: Lesson 4 3D Depth

MGMT - All We Ever Wanted Was Everything from oneedo on Vimeo.
   One of the things we are aiming to do in this workshop is enhancing our skills in motion graphic, so this clip is to show us an example of what we will be making. We are going to do is just pull the camera back it can bring the quality of the clip. The camera starts close in and has it pulls back you are revealing the character and object in your piece of work. The potential of how you can develop It as a storyteller is good. We are also going to be applying something similar, the type of roll on that rolls on each image (scene). We are going to be doing a sympathise way to our art work. 

     After all of this editing and spacing out the layers, click on layers, camera and leave everything default except the enable depth of field which means you want to allow some thing to be out of focus. Then an orange bar that appears as it represents the camera tool. To use the camera tool, we put a key frame of point of interest and position in the beginning and the end.

Building from LEI TANG on Vimeo.

Thursday, 10 December 2015

Blowing up Typeface 3

Physical Studio

The third lesson


    Third class, the tutor let us continue to work, and put the second lesson's work into the a  more larger paper, but this difference is we do not use the pens. We must use  other material to complete. Such as water, metals and so on. I think a lot, and then try to start doing, just try a lot of material. But the final results are not satisfied, then I think the Chinese ink paintings. I hold that  I can put each letter, I can made sense of ink. I got to start my  ink work. The process is very dirty and tired, however I get much happiness.

Thursday, 3 December 2015

Cereal Package Prototype

Cereal Package Prototype


This is what I finally finished the job printed, and then I cut it with scissors, then glue with glue, I think this time we have done most of the work more meaningful! At the same time, I saw my own shortcomings, I still need more effort and learning. I am learn everything from my  classmates  in the process of learning. If there are some things that I really do not know , i will try my best to finish the work with my classmates.I think i need work hard.

Wednesday, 25 November 2015

After Effect: Lesson 3 Boiling Technique

     We were told to bring three images we sketched out each on different paper. The images had to be near the same position and mainly the same thing because this will be effective for this lessons purpose. I sketched mine immediately the moment I entered the class because the completely slipped out of my mine after two weeks of different process and productions lessons. 


drawing move from LEI TANG on Vimeo.

Thursday, 19 November 2015

Cereal Package Design

Lesson 2 - Generating Package Artwork
 Package Layout guide
     In this session we was introduced to the artwork production pipeline necessary for taking our package design through to print and physically construct. From this lesson we needed to bring the layouts created in the first lesson and also an idea of a colour palette. The outcome from this workshop will be print ready artwork for your cereal package design. 

The simple man
The smug character I chose and illustrated on Illustrator. I chose this character because i like this man.I really like different
things, maybe everything is simple, but i like the simple style.
When I finished the package, I feel I still have a lot to learn. I am not very satisfied with this work, because I saw other people's work when I felt my own shortcomings, I am not satisfied with my ideas about the package work.

Blowing up Typeface 2

Physical Studio: Session 2

The second lesson


Second class, the tutor  let us continue to do the last class to do the content, but this is different from the last work. We must selected  a good one in the last time. It is enlarged, a letter a4 paper, a total of 16 sheets of paper. I thought  a long time, and then I select the" i am the ruler", I think I can put each letter, and i can made sense of a ruler on every fonts. I used white marker pen and  black marker pen to finish this work, I think the process is very long, but I am very satisfied with the work.

Wednesday, 11 November 2015

After Effect: Lesson 2 Loop Experiment

Loop Experiment

After Effect Lesson 2


   This is music video shown to us as an example of the type of loop we was going to create this session. Kylie Minogue has been looped through the video more 4 times. The video is relevant to the type of video we will be producing in todays session. What we needed is a small footage that could loop, one of the good examples is someone standing still and jumping up once. The footage is advised to be one second long as it will be more effective.  
                         

Loop experiment inspired by music video.

Come into my world by Kylie Minogue
For this session we will be generating one clip running 10 seconds long at 12 to 25fps.  I had previously prepared making my clip that I could use within the loop clip, I used my mobile phone to take 1 to 2 second long video. I had made certain that nothing would conceal the subject I was trying to catch as i will be needing to use the pen in After Effect to crop out. The subject I had on video was of another student walking to the right and jumping once. I chose the jump because it would be effectively easier to crop out. Initially I searched a short video clip such as a gif to use but only came across cartoon style short gifs that and it was preferred for us to videos we had recorded ourselves. I continued to work with the clip I recorded of my colleague and I had cropped out the body jumping, then searched for a copy free right background of a city, ensuring it was HD quality.  

For this session we will be generating one clip running 10 seconds long at 12 to 25fps.  I had previously prepared making my clip that I could use within the loop clip, I dnowload the gif from google. I had made certain that nothing would conceal the subject I was trying to catch as i will be needing to use the pen in After Effect to crop out. The subject I had on video was of a mouse. I chose the mouse,because it would be effectively easier to crop out. 


mouse gif from LEI TANG on Vimeo.

Thursday, 29 October 2015

Blowing up Typeface

Physical Studio

The first lesson


The tutor let us do some fonts about "i am `` `` ``",  and just a piece of paper to draw 16 grids. Each grid only draw a word. We looked at a lot of examples , it brought a lot of ideas about fonts. So I started to make some of my ideas, then start with a pencil drawing. The first picture is what I think, I want to be a Superman, there are lots of superman, I just want to be a design of Superman, so I put the letter of the alphabet
 together to form a large letter. Secondly, I use our own language to do the work, it means i am a famous artist? Obviously I'm not, so I put a question mark. The Third one, I got my idea from my ruler, I hold that it must very interesting, so i just try it.

Thursday, 15 October 2015

After Effects: Motion Graphic


Motion Graphic
                                                                A Teacher Explaining Mathematics
Our task is to create a short ten second clips in After Effect for each workshop and they will all be different workshops exploring different areas and themes.Some of the themes are visual but also motion. A loop is a motion. Then at the end it will be 30 seconds showing each of my clips throughout the year. The tasks were given is working towards the placement level, so i will be more than ready for an industry by the end of the year.

I used Illustrator to design my quick character ‘Teacher’, with simple 7 layers that includes hair, head, white shirt, red tie, suit, hand and brown trousers. As you can see my character resembles a business man too and that is because he was inspired from a business man but as time went on i found really a good textures that suited each other which convinced me to go for a teacher appearance instead.  I created these layers separately so can then later utilise and manipulate them on After Effect; they will have more of a great effect. The image then was imported on After Effect, i made sure to click ‘composition retain layer’ and click off ‘eps sequence’ because this will allow me to play with each later. The composition width of 1920 and height 1080 with the frame rate ’25’ and 10 seconds.
It,s my first time to use Ae, I really do not know how to make the work. It's very hard for me, so the process of work is no clearly. I just try to make it. 

Thursday, 8 October 2015

Character Development


Today in process and production lesson we were introduced to production techniques creative process to create a character for our cereal package which we will also eventually design and produce prototypes. We were told before hand to bring the basic essentials for drawing like sketchbook and drawing equipments. The outcome i received from this lesson was three papers of character sketches and productions layouts for a new brand of breakfast cereal.


Whilst sketching out my characters i considered the form of the character and making them dynamic so they are interesting to look at. I designed them in different face expressions and positions while also aiming for eager look. I wanted them to look eager being around the cereal. The age group i aimed for was from 4 to 10.


Hold Wo